STEP BY STEP - A Photographic journey of tree decoration!
As this is posted, it is the eve of December, so it’s time
to set up the tree! But how? We will try to help.
Normally we decorate with a combination of ribbon, picks,
ornaments, and garland. For each category there are big ones, small ones, and some
as big as your head. If you need help choosing between these
options, please refer to our previous blog posts about designing a tree. This
week we are only covering basic decorating techniques.
“In what order should I attack (a.k.a. “decorate”) my tree?”
- Ribbon
- Large Picks
- Large Ornaments
- Small Ornaments
- Small Picks
- Garland
- Sure!
Do whatever you like! It’s all about lookin’ good!
"How do I specifically place the ribbon, ornaments, picks,
and garland on the tree?"
- Ribbon.
A.
Start
from the top and work your way down in spirals. If you’re only viewing your
tree from one angle, don’t worry about spiraling around the entire tree. You
can just work back and forth along the viewed angle.
B.
When the branches on your tree are close
together, tuck the ribbon towards the center of the tree. When there is a “hole”
in the tree (when you can through to the trunk), bring your ribbon forward and
smooth it out so that you can see the entire width of the ribbon. Don’t be afraid to manhandle your ribbon and
twist it as you see fit.
C. Sometimes you can use two ribbons, as Joey did
below. With the second ribbon you can see more
easily how to poof it out and bring it forward.
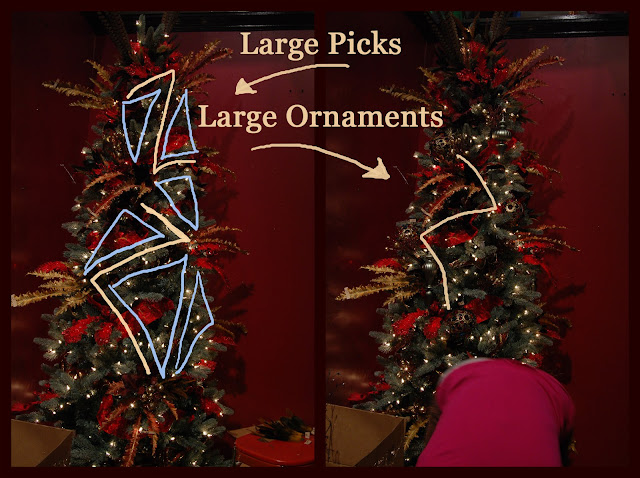
2. THE “Z”
Ornaments and picks are generally put onto
the tree in a triangular or “z” pattern. You probably already do this. Just try to keep ornaments equidistant apart.
For help, follow my silly drawings from the photo below.
I drew in “Z’s” or triangles. Work with whichever makes more sense for you.
When you put your initial large picks and ornaments on the tree, keep your “Z”
going on. The size of the Z (distance between items) is completely up to you.
3. Notes on Large Picks
You’ll see on this tree that
we kept the majority of the large picks close to the top. Larger florals are particularly useful for
filling in gaps, making a slim tree appear fuller, and for occasionally
moonlighting as a tree topper. Your
picks will have more of an impact at the top. Although we only used two or
three at the top, it makes a statement.
4. As you add more ornaments and picks, keep
your “Z” in mind, but you'll end up focusing more on filling blank areas of the tree.
5. Small picks and clips, like butterflies are
birds, are a garnish. Because they clip
to the tips of branches, instead of purely filling holes, stick to a rough “Z”
pattern.
6. Garland.
If you’ve seen our time lapse
video concerning this decoration start to finish, you know that this tree didn’t
get a garland. Garland has a hidden
complexity, so it will be covered in a separate post. Sorry!
For those who missed it : here's a link to our time lapse video! (Featuring our this Jim Morrison tree's decoration from start to finish) Tequila Time Lapse
Garden Pastimes at home : The "Z" is key! Otherwise, if we have an idea in mind we through all rules through the window and do whatever we want.


No comments:
Post a Comment