Friday, November 30, 2012

How to Decorate a Tree : Step by Step

 STEP BY STEP - A Photographic journey of tree decoration!

   As this is posted, it is the eve of December, so it’s time to set up the tree!   But how? We will try to help. 

    Normally we decorate with a combination of ribbon, picks, ornaments, and garland. For each category there are big ones, small ones, and some as big as your head.  If you need help choosing between these options, please refer to our previous blog posts about designing a tree. This week we are only covering basic decorating techniques.

“In what order should I attack (a.k.a. “decorate”) my tree?”
  1. Ribbon
  2. Large Picks
  3. Large Ornaments
  4. Small Ornaments
  5. Small Picks
  6. Garland 
             -“I did that but my tree looks funny, can I go back and change the order?”
                       - Sure! Do whatever you like! It’s all about lookin’ good!


"How do I specifically place the ribbon, ornaments, picks, and garland on the tree?"
  1. Ribbon.   
A.      Start from the top and work your way down in spirals. If you’re only viewing your tree from one angle, don’t worry about spiraling around the entire tree. You can just work back and forth along the viewed angle.
B.      When the branches on your tree are close together, tuck the ribbon towards the center of the tree. When there is a “hole” in the tree (when you can through to the trunk), bring your ribbon forward and smooth it out so that you can see the entire width of the ribbon.  Don’t be afraid to manhandle your ribbon and twist it as you see fit.
C.  Sometimes you can use two ribbons, as Joey did below.  With the second ribbon you can see more easily how to poof it out and bring it forward.


      2.   THE “Z”   
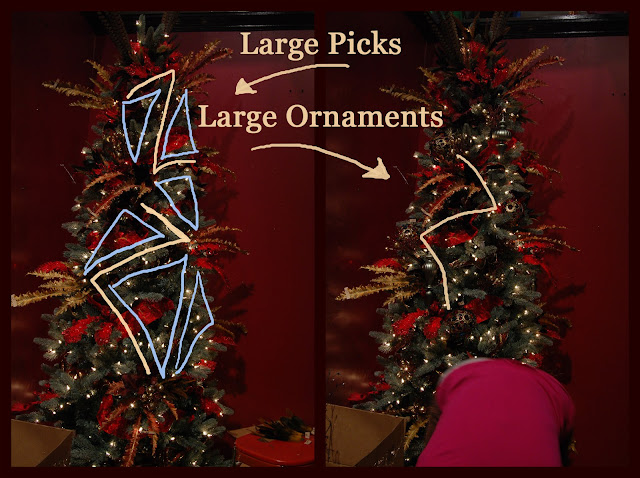
           Ornaments and picks are generally put onto the tree in a triangular or “z” pattern. You probably already do this.  Just try to keep ornaments equidistant apart.  For help, follow my silly drawings from the photo below.  


I drew in “Z’s” or triangles.  Work with whichever makes more sense for you. When you put your initial large picks and ornaments on the tree, keep your “Z” going on.  The size of the Z (distance between items) is completely up to you. 


     3. Notes on Large Picks 
     You’ll see on this tree that we kept the majority of the large picks close to the top.  Larger florals are    particularly useful for filling in gaps, making a slim tree appear fuller, and for occasionally moonlighting as a tree topper.  Your picks will have more of an impact at the top. Although we only used two or three at the top, it makes a statement.  

     4. As you add more ornaments and picks, keep your “Z” in mind, but you'll end up focusing more on filling blank areas of the tree.  

    5. Small picks and clips, like butterflies are birds, are a garnish.  Because they clip to the tips of branches, instead of purely filling holes, stick to a rough “Z” pattern. 

    6. Garland. 
        If you’ve seen our time lapse video concerning this decoration start to finish, you know that this tree didn’t get a garland.  Garland has a hidden complexity, so it will be covered in a separate post.  Sorry!

For those who missed it : here's a link to our time lapse video! (Featuring our this Jim Morrison tree's decoration from start to finish)   Tequila Time Lapse


Garden Pastimes at home : The "Z" is key! Otherwise, if we have an idea in mind we through all rules through the window and do whatever we want.

Friday, November 23, 2012

How to Design a Christmas Tree


Week Two: Hints and Frequently Asked Questions


“How do you come up with the ideas for your trees?”
We generally imagine some themes, pick our color palettes, and go for it. Themes or palettes give you some
discipline for your design and keeps the tree from looking cluttered.

Get your inspiration from anywhere! Choose favorite colors to make it simple. This year we have a “Jim Morrison” tree, along with “Doris Day.” Do customers recognize who is Jim and who is Doris? No… but if we just threw the two sets of decorations onto trees they’d notice that the store looks like a load of you-know-what.

As you work, keep editing, but don't be afraid! What you pictured in your head might not happen in real life, so go ahead and ditch that ribbon or garland if it rubs you the wrong way.  On the other hand, if those huge teal ornaments don't make any sense "logically" with your palette of silver and gold but you can't help but love them, keep them!   Trust that instinct.


“Do I need ribbon and picks and ornaments and garland? What’s the point of each of them?”

You might not need them all, but it's difficult to use only one.

Meet Jim.
He has ribbon, ornaments and picks,
but garland was too much!
1.  Ribbon. Ribbon helps fill initial holes between branches and creates a constant throughout the tree. It also makes [lateral] lines, which picks and ornaments don’t do. If you don’t like ribbon, try some garland.

2.  Ornaments. If you design a tree without any ornaments, it will either look really awful or really awesome. You’ll have to trust yourself on that one.

3.  Picks. Picks help fill out a tree, especially if you have a thinner tree or one without many tips. You can also use multiple picks at the top of the tree if you don’t have a topper. You might not need picks, but they add texture and shapes that ornaments can’t give you.

4.  Garland. Garland can be that perfect finishing touch, or it can turn your classy tree into a cluttered mess. If you already have a noticeable amount of ribbon, or if you have many picks that stick out farther than the tips of the tree, you probably won’t need garland. If you only have a bunch of ornaments and a little bit of ribbon, a simple drape of garland will work well.


“Can I use tinsel?! Does anyone use that anymore?!”
 Sure! Go for it!


As we said in the previous article – If you don’t know what is aesthetically good looking on a tree, just focus on creating balance of design elements, especially shape, color, texture, and size. Also, don't forget to add some that twinkle and light.


Tuesday, November 13, 2012

How to Decorate a Christmas Tree: Week 1

Week 1: Redesigning The Family Tree

We have been getting many questions on “how to decorate a Christmas tree,” and now we want to answer them! However, we can’t settle on “rules” to decorating.  Whenever we make one, we break it. Here, we’ll just keep it simple with generalizations. If you’d like help with specifics for your tree, just drop by the store to chat or comment here on our blog.

This article starts with Step 1: Initial Concept and Design: The Family Tree. (Sounds fancy, right?)  Next week we will outline some helpful hints on jumpstarting the creative process and designing your own cohesive tree from scratch!  

The Family Tree (Seemingly without theme) 
You, like most families, might not have presupposed “themed trees;” you might hang the ornaments passed down in your family or the ornaments your kids made in 1st grade.  Maybe you top the tree with a star made from tin foil, and you string popcorn garland. Still, there are ways to create a cohesive look from a preexisting collection of ornaments. 

Where to start: Preparation! Grab a mix of your ornaments and decorate a small area of your tree.  (It’s easiest to do on your tree, but if you use a live tree or don’t want to get into storage yet, just lay your collection along a green sheet or towel. Don’t forget that your tree is green! That sounds dumb, but it’s important.)

What are you looking for once the ornaments are on the tree?  You’re trying to find what you like. Generally, in themed trees and family trees, you want to have a well balanced mixture of design elements – notably color, shape, size, and texture.  (Also consider light; Christmas should twinkle.)  

Example #1:  You have a guhzillion big red round ornaments, along with a hoard of big pink round ornaments. The combo creates two problems: too much "big/round" and the colors could clash.  I’d recommend adding smaller ornaments in a different shape and color such as small silver finials (drop-like ornaments). They will add balance and heal your tree from the chickenpox outbreak. As for color, many pinks and reds clash. Try either taking out the pinks, or adding a different color to distract your eye from the pink and red.

Continuity: Family trees often need to work on continuity or flow to achieve balance.  Because each ornament generally stands alone, (ex. - “Baby’s 1st Christmas”), the tree can appear disjointed or messy.  Fix this most easily with a garland, picks, or an odd-numbered set of plain ornaments. Figure out what colors or shapes could mesh easily with your current ornaments. 

Example #2:  Your ornaments are mostly red and green, but a few have some gold or silver.  Drape thin silver or gold tinsel garland evenly across your tree, or grab gold ornaments from the dollar store and space them equally . 
Example #3: Or, maybe you’re an outdoorsy family! Your tree is decked with animals, skis, and soccer balls! Simply finish out your tree with small natural picks like twigs, pine, or feathers. 

So, dig through the dust and bring out the boxes! Remember that the ornaments you have already look good; that's why you like them. Making them look good together can be tricky without a bit of balance.  If you'd like tips on where to place ornaments or how to drape garland, keep checking back!  Each Friday evening we'll bring out a new article.


Garden Pastimes at home : We rarely have themed trees! Although each of our personal styles shine in our trees at home, we enjoy our family's sentimental or quirky ornaments. 

Thursday, November 1, 2012

How to Decorate a Christmas Tree - video!


Hello!  

We've been having a bit of fun lately, and the Christmas shop is open!  

We often receive questions about how to decorate a christmas tree.  So, soon we'll be blogging about our approach to decorating, complete with step by step instructions and general design theories.

But first!  Have some fun with our first Garden Pastimes video.